Extracting Data from a Meta Quest 3 using MTP
Extracting data from a Meta Quest 3 using MTP is a straightforward process that allows you to access the device's internal storage and transfer files to and from the device. This method is useful for extracting data from the Quest 3 without the need for expensive software or complex tools, making it accessible to a wide range of users.
Write blocker
Before connecting the Meta Quest 3 to a computer for data extraction, it is essential to use a write blocker to prevent any changes to the device's internal storage1.
Many hardware and software solutions are available for write blocking. Where possible, use a hardware write blocker for the most reliable protection. However, most software write blockers are sufficient for general use.
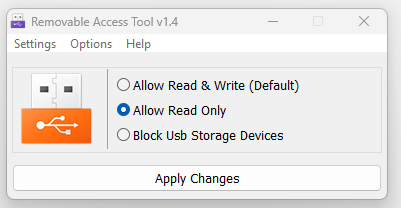
In this guide, we will use a software write blocker2 to prevent any changes to the Meta Quest 3's internal storage during the extraction process.
Connecting the Meta Quest 3
I don't think I need to explain how to plug in a USB cable, if you are having any problems make sure your cable is a data cable and not just a charging cable. If possible use the cable that came with the device.
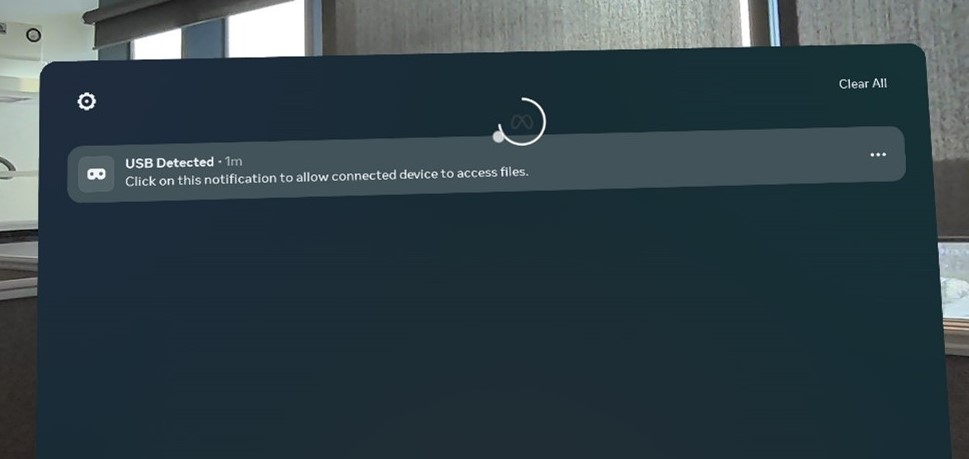
Once the Meta Quest 3 is connected to your computer you will get a notification on the device asking you to allow access to the device, you will need to allow this for the computer to access the device. Just simply click on the notification and this will allow the computer to access the device.
Once you have allowed access to the device, you can access the internal storage of the Meta Quest 3 using the file explorer on your computer. The device will appear as a removable storage device, and you can browse the files and folders on the device as you would with any other storage device.

Forensically Collecting This Data
As this guide is aimed at hobbyists as well as professionals, we will cover how to collect this data using 2 different methods. The first method will be using just the file explorer and the second method will be using a forensic tool often used in the industry called Magnet AXIOM3.
There are many other tools available but this is the one we have chosen to cover in this guide as its one of the most popular tools in the industry and one we have access to.
- File Explorer
- Magnet AXIOM
With the Meta Quest 3 connected to your computer, you can use the file explorer to manually copy files from the device to your computer. This method is suitable for small-scale extractions and allows you to select specific files or folders to copy.
To extract data using the file explorer, follow these steps:
- Open the file explorer on your computer.
- Locate the Meta Quest 3 in the list of removable devices.
- Browse to the device's internal storage and select all the folders.
- Copy the folders to a location on your computer.
This is the best option available for hobbyists who don't have access to forensic tools as they often come with a high price tag.
This method of extraction is not considered forensically sound as it does not maintain the integrity of the data during the extraction process. There is no way to verify that the data has not been altered or tampered with during the extraction or when stored on the computer.
If you have access to a forensic tool such as Magnet AXIOM and are familiar with it, we doubt you need this guide. However, if you are new to the tool or just want to see how it works with the Meta Quest 3, follow these steps:
- Open Magnet AXIOM Process and create a new case.
- Select the option to add a new evidence source.
- Choose the option to add a mobile device.
- Choose the MTP option and connect the Meta Quest 3 to your computer (If not connected already).
- Magnet AXIOM will scan for devices and prompt you to choose one from the list.
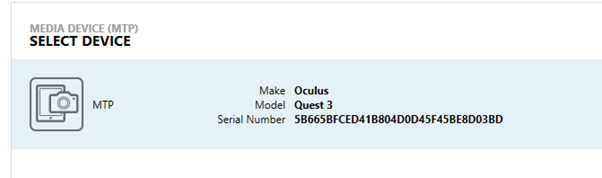
The device should appear something like this. - Select the Meta Quest 3 from the list and proceed with the extraction process.
- Magnet AXIOM will ask you which image type you wish to do, there is only one option so select that and proceed.
- Click through the rest of the menus leaving the default settings (unless you know what you are doing).
- Click the start button and let Magnet AXIOM do its thing.
Magnet AXIOM will extract the data from the Meta Quest 3 and present it in a forensically sound manner, maintaining the integrity of the data throughout the extraction process. This method is suitable for professional forensic investigations where the integrity of the data is critical and must be maintained to ensure its admissibility in court.
Conclusion
And that's it, you have successfully extracted data from a Meta Quest 3 using MTP. This method is suitable for a wide range of users and provides a simple and accessible way to access the device's internal storage. Whether you are a hobbyist, researcher, or professional investigator, extracting data using MTP is a valuable tool in your forensic toolkit.
References
Footnotes
-
Association of Chief Police Officers (2011). ACPO Good Practice Guide for Computer-Based Electronic Evidence. Available at: https://npcc.police.uk/documents/crime/2014/Revised%20Good%20Practice%20Guide%20for%20Digital%20Evidence_Vers%205_Oct%202011_Website.pdf (Accessed: 31 January 2025). ↩
-
Sordum Team (2020) Ratool v1.4 (Removable Access tool). Available at: https://www.sordum.org/8104/ratool-v1-4-removable-access-tool/ (Accessed: 31 January 2025). ↩
-
Magnet (2025) Magnet AXIOM. Available at: https://www.magnetforensics.com/products/magnet-axiom/ (Accessed: 31 January 2025). ↩