Extracting Data from a Meta Quest 3 using ADB
Before you can proceed with this guide you must Enable Developer Mode
What is ADB?
ADB (Android Debug Bridge) is a command-line tool that allows you to communicate with an Android device from a computer. It is used by developers and advanced users to perform various tasks on an Android device, such as installing and debugging applications, transferring files, and accessing the device's internal storage.
Setting up ADB
To use ADB to extract data from a Meta Quest 3, you need to install the Android SDK Platform Tools on your computer. These tools include the ADB command-line tool, which you can use to communicate with the device.
You can download the Android SDK Platform Tools from the Android Developers website.
Once you have downloaded the Android SDK Platform Tools, you need to extract the contents of the ZIP file to a folder on your computer. You can then open a command prompt or terminal window and navigate to the folder where you extracted the tools. All the ADB commands you run will be done from this location.
If you encounter any issues with any of the commands below you may need to download the Oculus ADB Drivers from the Meta Quest Developer Dashboard.
Collecting The Data
As this guide is aimed at hobbyists as well as professionals, We will cover how to collect this data using 2 different methods. The first method will be using the command line and the second method will be using a forensic tool often used in the industry called Magnet AXIOM1.
There are many other tools available but this is the one we have chosen to cover in this guide as its one of the most popular tools in the industry and one we have access to.
- Command Line
- Magnet AXIOM
To extract data from a Meta Quest 3 using ADB over the command line, follow these steps:
- Connect the Meta Quest 3 to your computer using a USB cable.
- Open a command prompt or terminal window on your computer.
- Navigate to the folder where you extracted the Android SDK Platform Tools.
Throughout the rest of this guide, you must ensure the device stays awake and unlocked, if the device goes to sleep or locks you will need to start the process again. This can be achieved by either wearing the device or by covering the sensor on the device in the centre above the eyepiece.
- Run the following command to list the connected devices:
./adb.exe devices
If the device is connected and authorised, you should see it listed in the output. It should look something like this:
List of devices attached
XXXXXXXXXXXXXXXX	device
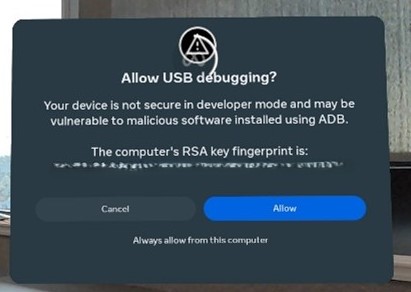
If the device is not listed, you may need to authorise the connection on the device. Check the device screen for a prompt to allow USB debugging.
- Run the following command to pull the data from the device:
./adb.exe backup -apk -shared -all -f ./backup.ab
This command will create a backup of all the data on the device and save it to a file called backup.ab in the current directory.
The flags included in the command are:
-apk: Includes the application's APK files in the backup.-shared: Include the shared storage like an SD card in the backup.-all: Back up all the installed applications data.
-
On the headset you will need to allow the backup to proceed, this will be a prompt on the device screen. It will ask if you wish to set an optional password for the backup, you can choose to set one or not.
-
Next we will want to dump service data using the following command:
./adb.exe shell dumpsys > ./dumpsys.txt
This command will create a file called dumpsys.txt in the current directory containing the output of the dumpsys command. The dumpsys command provides detailed information about the system services running on the device.
-
Once the backup is complete and you have got your dumpsys, you now have a backup of all the data on the device that you can use for further analysis.
This method of extraction is not considered forensically sound as it does not maintain the integrity of the data during the extraction process. There is no way to verify that the data has not been altered or tampered with during the extraction or when stored on the computer.
If you have access to a forensic tool such as Magnet AXIOM and are familiar with it we doubt you need this guide. However, if you are new to the tool or just want to see how it works with the Meta Quest 3, follow these steps:
- Open Magnet AXIOM Process and create a new case.
- Select the option to add a new evidence source.
- Choose the option to add a mobile device.
- Choose the ADB option and connect the Meta Quest 3 to your computer (If not connected already).
- Magnet AXIOM will scan for devices and prompt you to choose one from the list.
If the device is not listed, you may need to authorise the connection on the device. Check the device screen for a prompt to allow USB debugging.
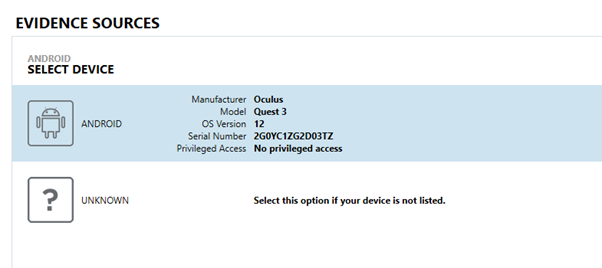
- Select the Meta Quest 3 from the list and proceed with the extraction process.
- Magnet AXIOM will ask you which image type you wish to do, there is only one option so select that and proceed.
- Click through the rest of the menus leaving the default settings (unless you know what you are doing).
- Click the start button and let Magnet AXIOM do its thing. Keep an eye on it as it may prompt you to do something on the device.
- The device will prompt you to allow the backup to proceed, this will be a prompt on the device screen. It will ask if you wish to set an optional password for the backup, you can choose to set one or not. Magnet automatically inputs the password "magnet" so you can just click OK.
Magnet AXIOM will extract the data from the Meta Quest 3 and present it in a forensically sound manner, maintaining the integrity of the data throughout the extraction process. This method is suitable for professional forensic investigations where the integrity of the data is critical and must be maintained to ensure its admissibility in court.
References
Footnotes
-
Magnet (2025) Magnet AXIOM. Available at: https://www.magnetforensics.com/products/magnet-axiom/ (Accessed: 31 January 2025). ↩